


Step-by-Step Guide to EZGO Lift Kit
What Is an EZGO Lift Kit — and Do You Need One?

An EZGO lift kit is one of the most impactful upgrades you can make to your golf cart. It raises the frame and suspension to create more ground clearance, allow larger tires, and improve performance on rough terrain.
Quick Answer: EZGO Lift Kit Basics
| Lift Height | Min. Tire Size Supported | Best For |
|---|---|---|
| No lift | Up to 20" overall diameter | Street/pavement only |
| 3 inch | Up to 22" overall diameter | Light trails, curb clearance |
| 4 inch | Up to 22–23" (with offset wheels) | Mixed use, neighborhoods |
| 5–6 inch | Up to 23–25" (with offset wheels) | Off-road, trails, aggressive builds |
Whether you're navigating campground trails, cruising a neighborhood, or building a fully custom cart, the right lift kit changes what your EZGO can do.
Most stock EZGO carts sit low to the ground — fine for a flat golf course, but limiting everywhere else. Add uneven pavement, grass, gravel, or dirt paths, and that clearance problem becomes obvious fast.
The good news: lift kits for EZGO carts come in several types and heights, fit most popular models (TXT, RXV, Medalist, Marathon, and Valor), and many install with basic hand tools — no cutting or welding required.
I'm Martin Davis, owner of Extreme Kartz, and I've helped hundreds of EZGO owners find the right EZGO lift kit for their specific model, tire goals, and riding conditions. In this guide, I'll walk you through every key decision — from lift type and fitment to installation steps and what to expect on the road.

Learn more about EZGO lift kit:
Choosing the Right EZGO Lift Kit for Your Cart
When shopping for an EZGO lift kit, you will quickly notice that they are not all built the same way. The four primary designs are spindle lifts, drop axle lifts, A-arm lifts, and long-travel suspension systems. Each category offers a different balance of ride quality, durability, installation difficulty, and price.
To help you narrow down the best setup for your cart, we have put together a quick comparison of how these designs stack up against each other:
| Lift Kit Type | Ride Quality | Durability | Installation Difficulty | Best For | Price Range |
|---|---|---|---|---|---|
| Spindle Lift | Standard / Firm | Moderate to High | Easy (Bolt-on) | Neighborhoods, flat trails, budget builds | $380 – $450 |
| Drop Axle | Firm / Rigid | High | Moderate | Utility work, budget off-road, TXT models | $150 – $290 |
| A-Arm / Double A-Arm | Smooth / Controlled | High | Moderate | Mixed use, moderate off-roading, RXV models | $340 – $550 |
| Long Travel | Premium / Plush | Extreme | Advanced | Heavy off-road, high-speed, rough terrain | $1,140 – $1,550+ |
Choosing the right type is the foundation of any successful suspension overhaul. If you want to dive deeper into general golf cart lifting dynamics, check out our comprehensive Lift Kit for Golf Cart guide. When you are ready to check out options engineered specifically for your ride, you can Browse EZGO Golf Cart Lift Kits at Extreme Kartz. All of our high-quality kits ship in 1-2 business days, so you can get started on your build right away.
Spindle Lift Kits for Pavement and Light Trails
Spindle lift kits are the most popular choice for golf cart owners who want a taller stance without completely rebuilding their front suspension. A spindle lift works by replacing your stock steering spindles with elongated, heavy-duty aftermarket spindles.
Because they retain the factory leaf spring or shock configuration, they are incredibly cost-effective and easy to install. The spindle design naturally pushes the front wheels slightly forward and outward, which square up the cart and lengthen the wheelbase for improved stability.
Premium manufacturers like Jake's construct these replacement spindles from ductile iron cast steel, which is up to three times stronger than standard gray iron. This makes them highly resistant to trail impacts. If you primarily use your EZGO for neighborhood cruising, pavement driving, or light gravel trails, a spindle kit is an excellent, low-maintenance choice. Read more in our detailed guide on the Spindle Lift Kit.
Drop Axle and A-Arm EZGO Lift Kit Options
For drivers looking to take their EZGO over tougher obstacles, standard spindles might not provide enough structural support. This is where drop axle and A-arm lift kits come into play.
A drop axle lift kit replaces the entire stock front axle assembly with a rigid, "dropped" aftermarket axle. This design is highly favored for older EZGO TXT and Marathon models. Because it replaces the central axle beam, it provides incredible stiffness and structural strength, making it ideal for utility carts carrying heavy loads. Brands like Steeleng (SGC) offer highly affordable 6-inch drop axle kits that feature Class 8.8 high-strength hardware with a 120,000 psi tensile strength, delivering rugged durability on a budget.
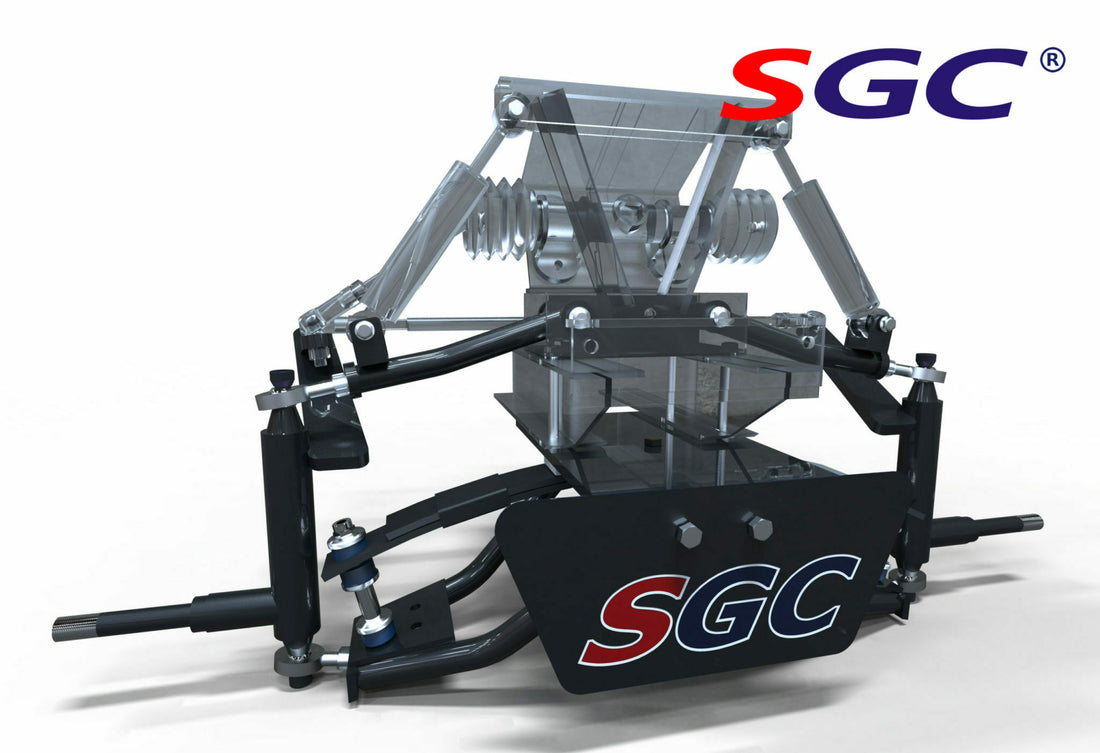
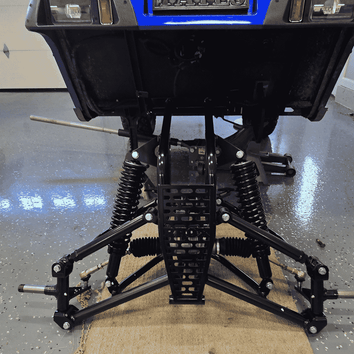
If you own an EZGO RXV or want a much smoother ride on uneven ground, a Double A-Arm lift kit is the gold standard. Instead of utilizing a solid front axle, these kits replace the stock front suspension with independent upper and lower control arms (A-arms).
Many premium A-arm kits, such as those from SGC or GTW, feature built-in coil-over shocks. This setup allows each front wheel to move independently, absorbing bumps and dips without transferring the impact across the entire chassis. This independent movement dramatically improves front-end control, cornering stability, and trail comfort. To find the perfect balance of strength and ride quality, you can Explore EZGO Lift Kits at Extreme Kartz and explore our curated collection.
Model Compatibility and Fitment Guide
One of the most common mistakes buyers make is purchasing an EZGO lift kit without verifying the model year, motor type, or steering configuration of their cart. EZGO has produced several iconic models over the decades, and their frame and suspension designs have evolved significantly.

Here is what you need to know about fitment across the EZGO lineup:
- EZGO TXT (1994–2025): The TXT is highly customizable, but mid-year changes matter. Carts manufactured between 1994 and mid-2001 (often called 2001.5) feature a 3-bolt steering column flange where the column meets the floorboard, and they use metal dust covers on the front hubs. Carts built from mid-2001 to 2025 utilize a 4-bolt steering column design. Always verify your steering column bolts before ordering a TXT kit. If you have an older model, you can review our 95 EZGO Golf Cart Lift Kit Guide for specific retrofitting tips.
- EZGO RXV (2008–Present): The RXV uses a completely different chassis than the TXT. Furthermore, RXV models built between 2008 and mid-2013 use different steering and hub configurations than those built from late 2013 to 2021. For the newest models (2022–2025 RXV and Valor), EZGO introduced the "Gen4" front suspension (carts built after January 11, 2022). These modern units require specialized OEM or compatible Gen4 lift kits featuring updated cast spindles and reinforced steel brackets.
- EZGO Medalist (1994–1999) & Marathon (1975–1993): Medalist models share many front suspension characteristics with early TXT carts, while Marathon models require highly specific vintage drop axle or spindle kits due to their older, integrated steering systems.
- Gas vs. Electric Fitment: Motor type plays a massive role in rear lift fitment. Electric models have a central electric motor mounted directly to the transaxle, whereas gas models feature an internal combustion engine mounted to a swing-arm frame. This changes how the rear shock mounts and lift blocks are positioned. For instance, gas TXT models from 2019 and newer utilizing the EX1 closed-loop EFI engine require specialized rear brackets compared to older Kawasaki-powered gas models or standard electric models.
When performing a major suspension upgrade, it is also the perfect time to evaluate your cart's power delivery. Lifting a cart and adding larger tires increases overall rolling resistance, which can strain older lead-acid batteries. Upgrading to a high-output lithium battery system from trusted brands like Bolt Energy, Eco Battery, Lithium Rhino, or Bedrock Battery ensures your lifted EZGO has the torque and voltage stability needed to climb hills and power through off-road trails effortlessly.
To make sure you don't miss any critical details during your build, check out our EZGO Golf Cart Upgrades Guide 2026.
Sizing Guide: Lift Heights and Tire Clearance
Once you have identified your cart model, you must decide how high you want to go. The lift height directly dictates the maximum tire size you can safely run without tire rub.
Here is a breakdown of the standard lift heights and their tire capabilities:
- 3-Inch Lift Kits: A 3-inch lift is the perfect "subtle" upgrade. It provides excellent ground clearance for driving over curbs, tall grass, or gravel roads while keeping the cart's center of gravity relatively low. A 3-inch lift easily accommodates up to 22-inch overall diameter tires. To learn more about this moderate option, read our 4 Inch Lift Kit guide (which covers both 3-inch and 4-inch configurations).
- 4-Inch Lift Kits: Highly popular for neighborhood cruisers, a 4-inch lift provides a balanced, aggressive stance. It easily clears 22-inch tires and can accommodate certain 23-inch tires if you use offset wheels to push the tires away from the inner fender wells.
- 5-Inch and 6-Inch Lift Kits: This is the most common setup for off-road enthusiasts. A 6-inch lift kit gives your EZGO a commanding presence and maximum ground clearance. It safely clears 23-inch all-terrain tires and can even support massive 25-inch tires when paired with long-travel suspension systems. For a deep dive into these taller setups, check out our 6 Inch Lift Kit Complete Guide and our Ultimate Lifted Golf Cart Tires Guide.
The Importance of Offset Wheels: When upgrading to 22-inch or larger tires, standard stock wheels will not work. Stock wheels have a centered offset that places the tire close to the cart's frame and suspension components. To prevent severe rubbing during tight turns, you must pair your lift kit with offset wheels (typically a 3:4 offset), which push the wheel and tire outward to create necessary clearance. This ensures proper fitment and prevents any contact with the body or suspension during sharp turns.
Step-by-Step Installation Process and Required Tools
Installing an EZGO lift kit is a highly rewarding DIY project that can typically be completed in an afternoon. While the exact steps vary slightly depending on whether you are installing a spindle, drop axle, or A-arm kit, the core process remains very similar.
Before you begin, gather the necessary tools:
- Floor jack and heavy-duty jack stands
- Socket wrench set (standard and metric)
- Adjustable wrench or open-ended wrenches
- Pliers and needle-nose pliers (for cotter pins)
- Rubber mallet or hammer
- Threadlocker (such as Loctite)
- Measuring tape (for alignment)
- Safety glasses and gloves
To understand how all these components work together in a lifted suspension system, read our Lifted Golf Cart Parts Complete Guide and our general Lifts for Golf Carts Complete Guide.
Pre-Installation Checklist for Your EZGO Lift Kit
- Work on a Flat Surface: Park your cart on a solid, level concrete floor. Engage the parking brake.
- Disconnect the Batteries: For electric carts, flip the Run/Tow switch to "Tow" and disconnect the main positive and negative battery cables to prevent accidental electrical shorts. For gas carts, disconnect the negative battery terminal.
- Organize Your Hardware: Lay out all the brackets, spindles, and bolts from your new kit. Use small containers to keep track of old hardware and new fasteners. If you are working on a TXT model, you can Find EZGO TXT Lift Kits at Extreme Kartz to review your specific kit's instruction manual ahead of time.
Step 1: Raise the Front End
Loosen the front wheel lug nuts slightly while the cart is on the ground. Place your floor jack under the front frame weldment (not the axle itself) and lift the cart. Place jack stands securely under the main frame rails and lower the jack so the cart rests safely on the stands. Remove the front wheels.
Step 2: Disassemble the Front Suspension
Disconnect the steering tie rod ends from the stock spindles by removing the cotter pins and castle nuts. Use a mallet to tap the spindle arm until the tie rod pops loose. Next, remove the hub dust caps, cotter pins, and hub nuts to slide the front wheel hubs off the spindles. Finally, unbolt the stock spindles (or the entire front axle if installing a drop-axle or A-arm kit) from the leaf springs.
Step 3: Install the New Front Lift Components
- For Spindle Kits: Bolt the new, elongated aftermarket spindles onto the stock axle using the provided high-strength hardware.
- For A-Arm/Drop Axle Kits: Bolt the new main A-arm assembly or dropped axle directly to the front frame mounts. Torque all fasteners to the manufacturer’s specifications.
- Reinstall the wheel hubs onto the new spindles, pack them with fresh grease if necessary, and tighten the hub nuts. Reattach the steering tie rods.
Step 4: Raise the Rear End and Install Rear Lift Blocks
Chock the front wheels. Loosen the rear lug nuts, jack up the rear of the cart from the rear frame, and support the frame with jack stands.
Place the floor jack under the rear differential housing to support the weight of the rear axle. Unbolt the rear U-bolts holding the leaf springs to the axle. Slowly lower the jack supporting the axle to create a gap between the leaf springs and the axle seats.
Insert the rear lift blocks into this gap (ensuring any alignment pins line up correctly). Raise the axle back up and install the new, longer U-bolts and shock mounting plates included in your kit. Tighten all hardware securely.
Step 5: Adjust Alignment (Toe-In and Camber)
Once the new wheels and tires are installed and the cart is back on the ground, you must perform a front-end alignment.
- Camber Adjustment: Ensure the front tires are perfectly vertical (or tilted slightly inward at the top, about 1 degree). Adjust this by turning the eccentric adjustment bolts on your new A-arms or spindles.
- Toe-In Adjustment: Use a tape measure to measure the distance between the front of the front tires and the back of the front tires. The front measurement should be roughly 1/8" to 1/4" narrower than the rear measurement (slight toe-in). Adjust the steering tie rods until you achieve this measurement to prevent uneven tire wear and erratic steering.
Frequently Asked Questions About EZGO Lifts
What is the maximum tire size I can run on a 6-inch EZGO lift kit?
With a 6-inch EZGO lift kit, you can safely run up to 23-inch tall tires. However, to prevent rubbing against the frame or body panels during tight turns or when carrying passengers, you must use offset wheels (such as a 12x7 or 14x7 wheel with a 3:4 offset). This pushes the tires outward, creating the necessary clearance.
Do I need to upgrade my leaf springs when installing a lift kit?
While not strictly required, we highly recommend upgrading to heavy-duty rear leaf springs when installing a lift kit—especially if you are adding a rear passenger seat or a utility cargo bed. Stock leaf springs are designed for two passengers on a flat golf course.
Adding weight to a lifted cart with stock springs causes the rear end to sag, which can lead to the rear tires rubbing against the fender wells. Heavy-duty multi-leaf springs restore proper ride height and prevent sagging under load.
Can I install an EZGO lift kit myself?
Yes! Most standard spindle, drop axle, and A-arm lift kits are designed as direct bolt-on upgrades. They require no cutting, welding, or drilling. If you have basic hand tools, a reliable floor jack, and jack stands, you can complete the installation in 2 to 4 hours.
Always follow the manufacturer's step-by-step instructions, use high-strength hardware, and take your time adjusting the front-end alignment once the cart is back on the ground.
Conclusion
Upgrading your cart with an EZGO lift kit is the ultimate way to unlock better ground clearance, fit rugged off-road tires, and completely transform your ride's aesthetic. Whether you choose a simple spindle lift for neighborhood cruising or a heavy-duty Double A-arm kit with coil-over shocks for demanding trails, matching the kit to your specific EZGO model and year is the key to a seamless build.
At Extreme Kartz, we pride ourselves on being a trusted, system-based authority. We don't just sell individual parts; we make sure you get a fully compatible suspension system that works perfectly from day one. If you have any questions about fitment, steering column compatibility, or choosing the right tire offset, our expert team is always here to help.
Ready to elevate your golf cart's performance? Shop EZGO Parts and Accessories at Extreme Kartz today and build the ultimate lifted ride!
Related Products


Vendor: LKTX06 - SGC Lift Kit - 6" Drop Axle kit for EZGO TXT/PDS (2001.5-2008) Gas

Vendor: 6" Drop Axle Lift Kit for EZGO TXT GAS (2008.5-Newer)

Vendor: RHOX BMF 7" A-Arm Lift Kit, E-Z-Go TXT Gas 19+ with EX1 Engine, Electric 01.5+

Vendor: RHOX 3" Drop Spindle Lift Kit, E-Z-Go TXT Gas 08.5-19 Kawasaki Engine


