


Eco Battery 48V 105Ah Thru Hole Installation: Unboxed & Installed
Wondering if the Eco Battery 48V 105Ah Thru Hole Bundle is worth the upgrade for your golf cart? In this guide, we unbox it, walk you through exactly what’s inside, and show you how Extreme Kartz handles the installation. From the lightweight design to the performance boost, this battery kit promises to make a real difference — but is it the right fit for your ride?
Video at a Glance
Full Unboxing
See exactly what’s in the kit before you order.
Step-by-Step Install
Extreme Kartz walks you through every step on a real cart.
Quick Chapters
Jump straight to “What’s Included” or “How to Install” in the video.
What’s in the Box
Here’s everything you’ll find inside a standard Thru Hole bundle:
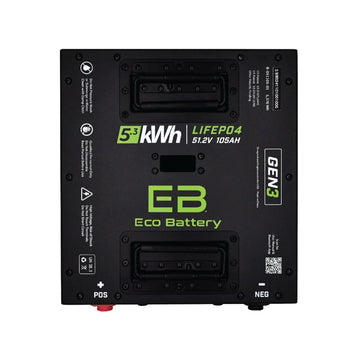
48V (51.2V) 105Ah LiFePO₄ Battery
Thru-Hole pack
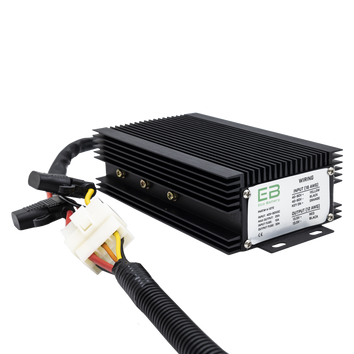
51V Lithium Charger
+ Locking charge port & plug
Digital SOC Meter
LCD/CAN display + harness
Mounting Hardware
Thru-hole specific for your cart
12V DC-DC Converter
Optional — bundle dependent
👉 About the 12V Converter: It steps 48V down to 12V, protecting your lights, radio, and phone chargers from voltage damage. Check your specific bundle to confirm if it’s included.
Step-by-Step Installation Guide
Safety First
Wear eye protection and insulated gloves; use insulated tools throughout. If you’re not trained to work with EV or lithium systems, have a professional handle the install.
Prep & Document
- Turn the key OFF; if your cart has a Tow/Run switch, set it to TOW.
- Take photos of existing batteries, cables, and accessory wiring for reference.
- Label the main positive/negative pack cables and any 12V accessory leads.
Remove the Old Pack
- Remove hold-downs, maintenance systems, and all interconnect cables.
- Lift out the old batteries (team lift — they’re heavy) and clean the tray.
Mount the Eco Battery
- Make sure the Eco Battery is off — press the power button until the green light comes on, then press again to turn it off.
- Set the 48V 105Ah thru-hole battery in place and secure it using the provided hardware for your cart model.
Mount the Charger
- Choose a spot protected from direct water spray with at least 6 inches of open space around the fan.
- Install the locking charge port in the body panel, then route the charger lead to it.
Install the 12V DC-DC Converter (if included)
- Mount the converter (40–90V input → 12V output).
- Wire per diagram: red = 12V+, black = 12V− to your 12V fuse block.
- Connect the orange “enable” wire to a switched B+ (key-on) or to battery+ for constant 12V.
Make the Main Battery Connections
- Stack ring terminals largest-draw first (controller), then lower-draw (charger, converter) on the battery studs.
- Connect all POSITIVE cables to the positive terminal, all NEGATIVE to the negative terminal.
- Double-check polarity before tightening to manufacturer torque spec.
Install the LCD/CAN SOC Meter
- Choose a panel location with enough depth behind it; cut a 2-1/16 in (52 mm) hole or use a mounting bracket.
- Plug the LCD harness into the battery (align the tab), route to the meter, and connect both white plugs to the back.
- If your charger uses CAN, plug its CAN lead into one of the meter’s CAN pigtails.
Final Checks & Power On
- Verify every connection: no loose lugs, correct polarity, secure mounts.
- Press and release the power button. Steady green = on. No green = error — contact your dealer or Eco Battery.
First Charge & Calibration
- Fully charge the battery before extended driving. The LCD meter self-calibrates to 100% after the first full charge.
- The power button must be on to charge.
- For storage longer than 14 days, turn the battery off and unplug AC from the charger.
Test Drive
- Turn the key to RUN/ON. Confirm the cart drives and all 12V accessories operate correctly.
- If everything checks out, button up the cart and enjoy the upgrade.
Tools & Pro Tips
🔧 Tools You’ll Need
- Basic socket set
- Insulated nut driver
- Torque wrench
- Crimpers + heat-shrink tubing
- 2-1/16″ hole saw (for SOC meter)
⚡ Pro Tips
- Take clear photos before removing anything — you’ll thank yourself later.
- Keep accessory grounds tidy on a fused 12V block.
- Never pressure-wash the battery.
- Charge daily for longest battery life.
Questions about your specific cart model? Call us — we actually pick up.
Related Products


Vendor: Eco Battery 48V 105Ah Thru-Hole Bundle - Select your Cart

Vendor: 48V 105Ah GEN3 Eco Thru Hole Battery Individual

Vendor: Eco Battery Charge Meter - 5V CAN LCD Kit w/cable

Vendor: Eco Battery Universal 12v Converter for 48v-72v Batteries


