


Golf Cart Enclosures 101: Stay Covered, Comfortable, and Ready for Any Season

When most people think of golf cart accessories, they picture lift kits, seat upgrades or custom wheels. But for those who use their carts year-round, on the golf course, around the neighborhood, or at resorts, golf cart enclosures are among the most practical and value-adding upgrades you can make.
A golf cart enclosure isn’t just about staying dry during a quick rain shower. It’s about comfort, protection, and usability across every season. The right enclosure shields passengers from weather, extends the life of your cart’s materials, and keeps every ride enjoyable no matter the forecast.
What Are Golf Cart Enclosures?
A golf cart enclosure is a soft-sided, weather-resistant system designed to protect the cart’s interior and passengers from the elements. These enclosures typically combine clear vinyl windows for visibility and durable canvas panels (such as marine-grade or Sunbrella-style fabrics) for protection.
Core functions include:
-
Shielding passengers, seats, and electronics from rain, wind, sun, and dust
-
Preventing UV fading, mildew, and corrosion
-
Providing a temperature-controlled cabin feel during cold or hot conditions
Depending on your setup, enclosures can be:
-
Removable (Over-the-Top): Easy to install and remove without tools.
-
Semi-permanent (Track-Style): Custom-fitted to your cart’s roof rails for daily, year-round use.
-
Full-Body Storage Covers: Designed for off-season storage and long-term protection.
Pro Tip: When selecting an enclosure, always check your cart make, roof length, and seat configuration. Compatibility ensures a snug fit and smooth zipping action.
Why You Need a Golf Cart Enclosure All-Weather Protection

Whether you’re driving through misty mornings, unexpected rain, or gusty afternoons, an enclosure helps you ride comfortably.
-
Vinyl windows block wind and moisture while maintaining clear visibility.
-
Sunbrella-style fabric resists UV rays, mildew, and cracking.
-
Many models feature zippered doors and roll-up panels, letting you customize airflow.
Protects Your Investment
Your golf cart is more than transportation – it’s an investment. A quality enclosure helps preserve:
-
Lithium battery compartments (protected from moisture exposure)
-
Upholstery and dashboards from UV cracking and fading
-
Electrical systems from rain and dust intrusion
Over time, that protection translates into fewer repairs and higher resale value.
Comfort & Convenience
A properly fitted enclosure doesn’t just shield your cart – it transforms your ride:
-
Blocks cold wind or excessive heat
-
Keeps your interior dry and clean
-
Adds a sense of privacy and comfort during rides
Roll-up side panels or zippered doors allow you to adapt quickly to changing weather, ensuring comfort without compromise.
Enclosure Styles We Offer
Extreme Kartz offers three primary styles of golf cart enclosures, each designed for specific use cases.
Over-the-Top Enclosures (Universal Fit)

Perfect for riders who want flexibility and ease of use.
-
Installs in minutes -- simply drape it over your cart’s roof.
-
Secured using Velcro straps and underbody hooks.
-
Includes clear vinyl windows with zippered or roll-up doors.
-
Ideal for seasonal or part-time riders.
Track-Style Enclosures (Custom Fit)

For frequent riders or those seeking a polished, semi-permanent solution:
-
Designed for carts with roof-mounted track systems or comes with the track system.
-
Offers a snug, sleek fit -- no loose fabric or flapping in the wind.
-
Features zippered doors, roll-up panels, and scratch-resistant vinyl.
-
Built with heavy-duty marine-grade canvas for year-round durability.
-
Optional weather seals enhance insulation and water resistance.
Storage Covers (Full-Body Protection)

When your cart is parked for weeks or months, a storage cover prevents damage from sun, dust, and critters.
-
Provides full-body protection during off-season or long-term storage.
-
Made from durable canvas or polyester, with elastic hems or tie-down grommets.
-
Shields against UV, rain, and debris.
Common Use Cases for Golf Cart Enclosures
|
User Type |
Benefits |
|
Golfers |
Stay dry between holes and warm during early tee times. |
|
Campground / Resort Riders |
Comfort during morning fog or sudden showers. |
|
Families |
Protects children, pets, and groceries during errands. |
|
Hunters / Utility Users |
Durable coverage against mud and outdoor terrain. |
|
Seasonal Riders |
Prevents long-term damage during storage periods. |
Expert Insight: Golf cart enclosures are especially useful for neighborhood riders and resort users who drive year-round. The ability to block wind and rain extends usability far beyond the golf course.
How to Choose the Right Golf Cart Enclosure
Choosing the right golf cart enclosure isn’t just about looks or price -- it’s about how well the product fits your cart, your lifestyle, and the environment you drive in. A well-matched enclosure can last for years, while a poor fit often leads to tearing, fogged windows, or flapping panels that make every ride frustrating.
Below are the four essential factors every cart owner should evaluate before buying.
1. Know Your Cart
Every golf cart model has its own frame geometry, roof length, and door opening design -- and these differences matter when selecting an enclosure.
-
Cart Make and Model:
Manufacturers like Club Car, EZGO, and Yamaha use distinct body shapes and roof support angles. A “universal-fit” cover may seem convenient, but it often leads to wrinkles, sagging windows, or stress points that tear over time. If your model is common, go for an exact-fit or track-style enclosure that’s engineered specifically for it. -
Roof Length (Standard vs. Extended):
Carts with extended roofs (80-inch+ tops) or rear seat kits need longer enclosures to cover the rear passengers. Measure from the front roof edge to the back to avoid short coverage that leaves the rear seat exposed. -
Number of Seats and Rear Seat Kit:
A 4-seater cart with a flip-down rear seat requires a different design from a standard 2-passenger cart. Enclosures built for “stretch” carts or those with cargo boxes also need added clearance and zipper length. -
Presence of a Track System:
Some modern carts (or upgraded roofs) have pre-installed track rails along the roofline. These allow you to slide in track-style panels for a more permanent, fitted enclosure. If your cart doesn’t have tracks, you can either install a kit or use an over-the-top enclosure that secures with Velcro straps.
Pro Insight: Before ordering, take three key measurements -- roof length, width, and seat count. A 1-inch difference can determine whether your enclosure fits snugly or sags at the corners.
2. Know Your Environment
Your local weather and terrain have a huge impact on which enclosure materials will perform best.
-
Wet or Humid Climates:
Choose a track-style enclosure with tight weather seals around the zippers and doors. These prevent moisture from entering during rain or fog. Look for heat-sealed stitching instead of sewn seams, as it better resists water intrusion and mildew. -
Sunny or Dusty Climates:
In areas with high UV exposure or blowing dust (like coastal regions or desert terrain), Sunbrella-style marine-grade canvas is worth the investment. It resists fading, cracking, and sun damage much longer than standard polyester. -
Cold or Windy Regions:
Go for thick, UV-treated vinyl windows and side panels with double zippers or draft flaps. This setup keeps warm air inside the cabin and prevents the “ballooning” effect from crosswinds.
Pro Tip: If you frequently transition between seasons, a modular enclosure (with roll-up doors and removable panels) gives you flexibility year-round.
3. Know Your Usage
How you use your cart should guide the level of protection you need.
-
Frequent Riders:
Daily drivers or resort users benefit from track-style enclosures. They offer a sleek, semi-permanent installation with less noise, less flapping, and better insulation. You can easily unzip or roll up panels when the weather improves. -
Occasional Riders:
If you mainly use your cart on weekends or just during certain seasons, an over-the-top enclosure provides a great balance between cost and convenience. It installs in minutes, stores compactly, and fits multiple models. -
Storage Use:
For carts that stay parked during the off-season, a full-body storage cover is the most practical option. It shields against UV, dust, and moisture -- protecting upholstery, batteries, and paint until next season.
Real-World Example: Many campground users keep a track-style enclosure on their primary cart but use an over-the-top cover for a spare utility cart used less often.
4. Know Your Budget
Price isn’t just about material cost. It’s about durability, lifespan, and convenience. The right investment depends on how often you drive and where you store your cart.
|
Type |
Typical Price Range |
Best For |
Key Advantage |
|
Over-the-Top Enclosures |
$150–$300 |
Part-time or seasonal riders |
Affordable, easy to install/remove |
|
Track-Style Enclosures |
$400–$900 |
Daily or all-weather riders |
Premium fit, durable, professional finish |
|
Storage Covers |
$100–$200 |
Off-season or long-term storage |
Cost-effective protection for parked carts |
Expert Recommendation: If your budget allows, start with a track-style enclosure for long-term use. Then add a storage cover for months when your cart is idle. The combination protects your cart both in motion and in rest.
Final Selection Checklist
Before you buy, review this quick pre-purchase list:
✓ Confirm your cart make, model, and roof size
✓ Choose a material that matches your local climate
✓ Decide between track-style or over-the-top based on usage frequency
✓ Set a realistic budget based on your long-term needs
Premium Materials & Feature Callouts
Clear Vinyl Windows
-
UV-treated, fog-resistant, and flexible for visibility and durability
-
Roll-up panels with Velcro or zippers for ventilation
Sunbrella-Style Canvas Panels
-
Marine-grade fabric that’s fade-proof and mildew-resistant
-
Built for heavy outdoor use and prolonged exposure
Hardware & Attachments
-
Over-the-top: Velcro + hook system
-
Track-style: Slide-in or zip-rail design
-
Add-ons: Weather seals, draft blockers, and vent kits available separately
Pro Insight: The quality of your vinyl and stitching dramatically affects longevity. Low-grade plastic can yellow and crack over time. Premium materials from trusted brands like Extreme Kartz resist degradation for years.
Step-by-Step Practical Installation & Maintenance
Below is a field-ready, step-by-step guide for installing and maintaining soft-sided golf cart enclosures. It’s written as a concise checklist you (or a technician) can follow with clear actions, tools, and quick troubleshooting for common problems.
Tools & materials you’ll need
-
Mild dish soap, bucket, warm water
-
Microfiber cloths and soft sponge
-
Soft-bristled brush (for canvas seams)
-
Snap-setter tool (if enclosure uses snaps) and small socket/driver set
-
Zipper lubricant (zipper-specific or PTFE/silicone zipper spray)
-
Vinyl protectant (non-abrasive, marine-safe)
-
Extra Velcro strips / nylon tie-downs / bungee cords (for emergency anchors)
-
Rubber mallet (for track kits) and clean rag
-
Replacement snaps or quick repair kit (clear vinyl patch kit + marine thread)
Pre-installation checklist (do this first)
✓ Record your cart details: make, model, roof length, seat count, presence of track rails.
✓ Lay out the enclosure on a clean flat surface and identify panels (front, rear, left, right, roof).
✓ Inspect seams, zippers, and snaps for defects. Don’t install damaged pieces. Repair or exchange first.
✓ Clean the roof and tracks of dirt/debris so panels slide smoothly.
✓ If vinyl is stiff from cold, warm it inside the sun (or use warm water) to make it pliable.
Step-by-Step Over-the-Top Installation:

(Quick, no tools required in most cases)
-
Unfold & orient: Place the enclosure on the ground and confirm which side is front.
-
Drape over roof: Lift and drape the roof panel evenly, aligning the front edge with the roof lip.
-
Align windows: Sit inside the cart (or step to each side) and adjust so clear vinyl windows line up with the cart openings and controls.
-
Secure top straps: Attach Velcro straps around roof supports--tighten enough to remove slack but not so tight that seams pull.
-
Attach underbody hooks: Fasten hooks to pre-existing anchor points or frame crossbars; tuck excess strap length.
-
Fasten bottom anchors: Engage any bottom snaps or cord hooks. If none exist, use tie-downs or clips around the frame.
-
Check doors & zippers: Zip open and close each door/panel to confirm smooth operation and correct zipper direction.
-
Tension check: Walk around the cart and ensure panels are taut (no large wrinkles), windows are flat, and no part flaps at highway speeds.
-
Final safety check: Confirm steering, pedals, and visibility are unobstructed; secure loose straps away from moving parts.
Pro fixes: if Velcro slips, add extra tie-downs or a small stainless steel hook under the cart. If windows sag, raise Velcro points slightly to redistribute tension.
Step-by-Step Track-Style Installation:

(Precise fit; requires tracks installed on roof)
-
Inspect & clean tracks: Remove grit; run a rag through the track rail to clear debris.
-
Lower top edge into track: Insert the top edge of the panel into the roof rail and slide it along the track to seat evenly. (Top-first prevents pinched fabric.)
-
Work downward: Pull the panel down and out of the track slowly, aligning side seams with roof supports as you go.
-
Zip/rail the side panels: Engage zippers or zip-rail systems fully--do not force a misaligned zipper.
-
Attach bottom snaps: Install and secure bottom snaps starting from the center, working outward to remove puckering. Use a snap-setter tool if provided.
-
Install weather seals (if included): Run seals into the mating surfaces; compress gently to confirm contact.
-
Adjust tension: Use any included straps or adjusters to fine-tune panel tension so windows lay flat and doors operate freely.
-
Test in motion: With panels secured, test at low speed to ensure no flapping; re-tighten as necessary.
Pro fixes: if a panel won’t seat into track, check for a bent rail or foreign object. Warm the vinyl to make it more flexible before re-attempting.
Post-installation checklist (always perform)
✓ Windows clear and aligned (no major creases)
✓ All zippers operate smoothly -- no catching or skipping teeth
✓ Bottom snaps engaged and evenly tensioned
✓ No interference with steering or pedals
✓ Secure loose straps away from wheels/axles
Maintenance: Step-by-Step schedule & actions
After every wet use
✓ Open or unzip panels to air out moisture.
✓ Shake off standing water and wipe heavy splashes from vinyl/windows.
Weekly (frequent use) / Monthly (occasional use)
✓ Clean vinyl windows: mix a few drops of mild dish soap in warm water. Use a microfiber cloth and wipe gently in straight strokes. Rinse with clean water and dry with a separate microfiber towel.
✓ Clean canvas panels: scrub with soft brush and mild soap solution; rinse thoroughly.
✓ Lubricate zippers: after cleaning, apply a zipper lubricant or PTFE zipper wax; work zippers fully open/closed 3×.
Quarterly (or pre-season)
✓ Inspect seams & stitching for wear. If stitches are loose, schedule seam repair (marine-grade thread).
✓ Inspect springs/hardware and replace any corroded snaps or rusty hooks.
✓ Apply vinyl protectant to clear windows and vinyl strips--follow product instructions and buff with microfiber.
Pre-storage (long term)
✓ Deep clean both vinyl and canvas; remove all dirt and salts (coastal areas).
✓ Air-dry completely -- do not pack damp fabric.
✓ Roll loosely (do not fold tight on vinyl windows). If possible, place a soft cloth between vinyl layers.
✓ Store in a ventilated bag away from direct sunlight, rodents, and high humidity.
Quick troubleshooting (common problems + fixes)
✓ Windows fogging: increase ventilation (open vents/doors); clean with anti-fog marine product if persistent.
✓ Zipper jams: clean grit out, then apply zipper lubricant; if teeth bent, replace zipper.
✓ Flapping panels: re-tension straps or add bottom snaps; if track-style, check that track is straight.
✓ Mildew on canvas: treat with marine/mildew cleaner or a diluted white vinegar rinse (spot test first), then rinse and dry thoroughly.
✓ Small vinyl tears: use clear vinyl repair patch for quick fix; for structural tears, replace the panel.
When to call a pro / replace
-
Windows heavily scratched, yellowed, or cracked → replace panels.
-
Seams failing in multiple places → professional restitch/replace.
-
Hardware bent or tracks damaged → professional track repair (improper DIY can worsen damage).
Final pro tip:
Always keep a small repair kit in the cart: spare Velcro strips, a patch, a tiny bottle of zipper lubricant, and a microfiber cloth. That small kit fixes 80% of on-trail issues before they become costly.
Comfort, Protection, and Value All Year Round
A well-chosen golf cart enclosure doesn’t just keep you dry -- it transforms how, when, and where you use your cart. From preserving your investment to providing year-round comfort, enclosures are one of the smartest upgrades you can make.
Whether you’re a daily driver, occasional golfer, or seasonal camper, there’s an enclosure that fits your cart and your lifestyle perfectly.
If you’re ready to ride comfortably in any weather, Extreme Kartz has you covered -- literally. Explore our premium golf cart enclosures and find the perfect fit for your make, model, and roof size.
Need guidance? Contact our team with your cart make, model, and roof length, and we’ll recommend the best-fitting option.
Frequently Asked Questions About Golf Cart Enclosures
FAQs
Pro Tip: If you live in a wet climate, choose a track-style enclosure with weather seals for maximum rain protection.
For safety, ensure your zippers and bottom snaps are fully secured before driving at higher speeds or on open terrain.
Avoid bleach, ammonia, or alcohol-based cleaners—they can cause fogging or cracking.
After washing, air dry the panels completely before storage.
Expert Tip: Apply a vinyl protectant spray every few months to keep the material flexible and UV-resistant.
Track-style enclosures: Custom-fit design with a sleek appearance, superior insulation, and durability for frequent riders.
It prevents UV damage, dust buildup, and moisture intrusion, keeping your seats and electronics in great shape. Combine a storage cover with a battery disconnect switch for long-term maintenance and safety.
Related Products

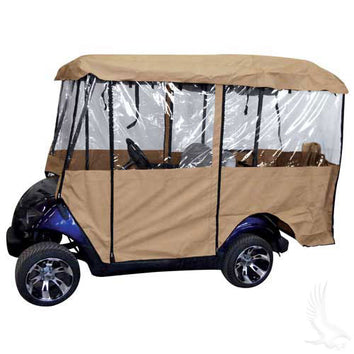
Vendor: RHOX Enclosure, for cars with 88" Tops - Sand

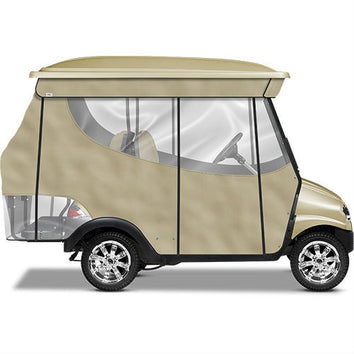
Vendor: DoubleTake Enclosure for 4 Passenger, 80" Top (Valance included)


Vendor: Odyssey Enclosure, 88" RHOX Top, for RHOX 88" Extended Top


